
Early articles dealt with Why to Take the CSWE Exam and how to layout a proper training program. (See the Complete CSWE Article Series Here). The real meat of the system is more than that so this article is slightly different. When you start messing around with configurations, you are entering a WHOLE new level of SolidWorks. There are serious hikers that like to travel long distances and there is a hiker named Ray Jardene who would cut up his sneakers to lighten his overall weight. Altering your configurations makes you a Ray Jardene of SolidWorks.
Before we get started, a good question is “when should someone start setting up configurations?”. There are a few schools of thought here… Mine is that you learn the good habits early, so you don’t have to spend time un-learning bad (slow) habits.
1. Make Sketching Normal.
This first one is easy. As soon as you enter a sketch, you want to be normal to it. You can either hit Control-8 or the “Normal to sketch” Icon.
| Normal to sketch icon |
Instead of doing that- you can have it go automatically by going to Option>Sketch> and checking the “Auto-rotate view normal to sketch plane on sketch creation”.
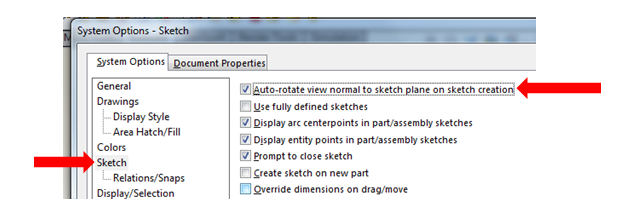 |
| Automatically transition to normal to sketch mode with this setting. |
Editor’s Note: You can also checkout the previous 3DEngr articles on sketching.
2. Setup mouse Gestures as 8-wheel format.
All of the 7 finalist in the SolidWorks world-speed test used 8-wheel mouse gestures. To follow their footsteps setup requires some thought.
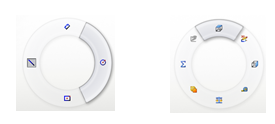 |
| 4 Button and 8 Button Mouse Gesture Options – These can be entirely customized |
What do you want to put in there? Well- first, I would try to separate your hot keys so they make sense. Right now (if you go with the stock configuration), you have all your solid features and reference geometry under the “s” key. Keep these. From mouse gestures, remove the overlapping features (like extrusion & the other solid geometry creation). Then add stuff. Notice that there are 4 “situations” you can use mouse gestures: Part, Sketch, Drawing & Assembly.
Here’s an example: I always find myself needing to attach 2 points with a 3D curve, so I’ve set up a 1-2 Combo. In Part mode, I have the 3D Sketch on the “North-East” position. In Sketch mode, I have the Spline in the “South-West”. So I do a swish-swish with my mouse, and I’m making some pretty complicated geometry. Whenever I do this, I feel like the Zorro of SolidWorks.
Some others I’ve got are: “Sketch Picture”, “Sketch”, “Equations” and “Measure”.
 |
| Setup custom mouse gestures for Solidworks |
To do this, go to: Customize (under the “Options” drop down-menu)>”Mouse gestures” Tab and make your adjustments.
3. Learn DriveWorks Express.
This is probably the best kept secret in SolidWorks, and something I have just started to geek out on. If you do the same type of parts all the time, you can set up DriveWorks to automatically make a new assembly, new parts & new updated drawings by changing some established variables. This will not help you with any of your SolidWorks certifications (like CSWP) BUT they do have their very own set of certification- and I’m predicting that they will do very well in the future (read: companies will be looking for people with this skill). Even without it being specifically on the CSWE a true Expert is prepared to use all portions of the software in order to find a solution.
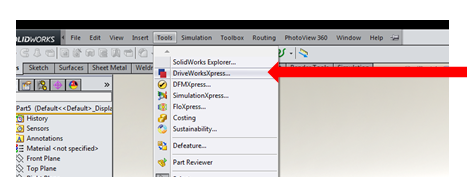 |
| Use Driveworks |
Check out www.driveworks.com. You can fire this up by going to Tools>DriveWorksXpress
Let me know if you come up with a “better mouse-gestures” set-up, or figure out another 1-2 combo.
Learn How To Pass The CSWE – See The Complete Article Series

Jim is a CSWP and on the road to getting his CSWE. He works for HawkRidge Systems, an authorized reseller of SolidWorks. Jim also runs i-elf, a product development consulting company. He can be reached at Jim.Lucas@i-elf.com.