Stay up to date on the newest Dremel 3D Printers. Dremel released a newer version of their Idea Builder 3D printer, the Dremel 3D40-01 Idea Builder 2.0 3D Printer, Wi-Fi Enabled with Guided Leveling.
Dremel also now offers a 3D printing package for education: The Dremel 3D40-EDU Idea Builder 2.0 3D Printer for Education, Wi-Fi Enabled with Curriculum-Based Lesson Plans

Dremel 3D40-01 Idea Builder 2.0 3D Printer Review
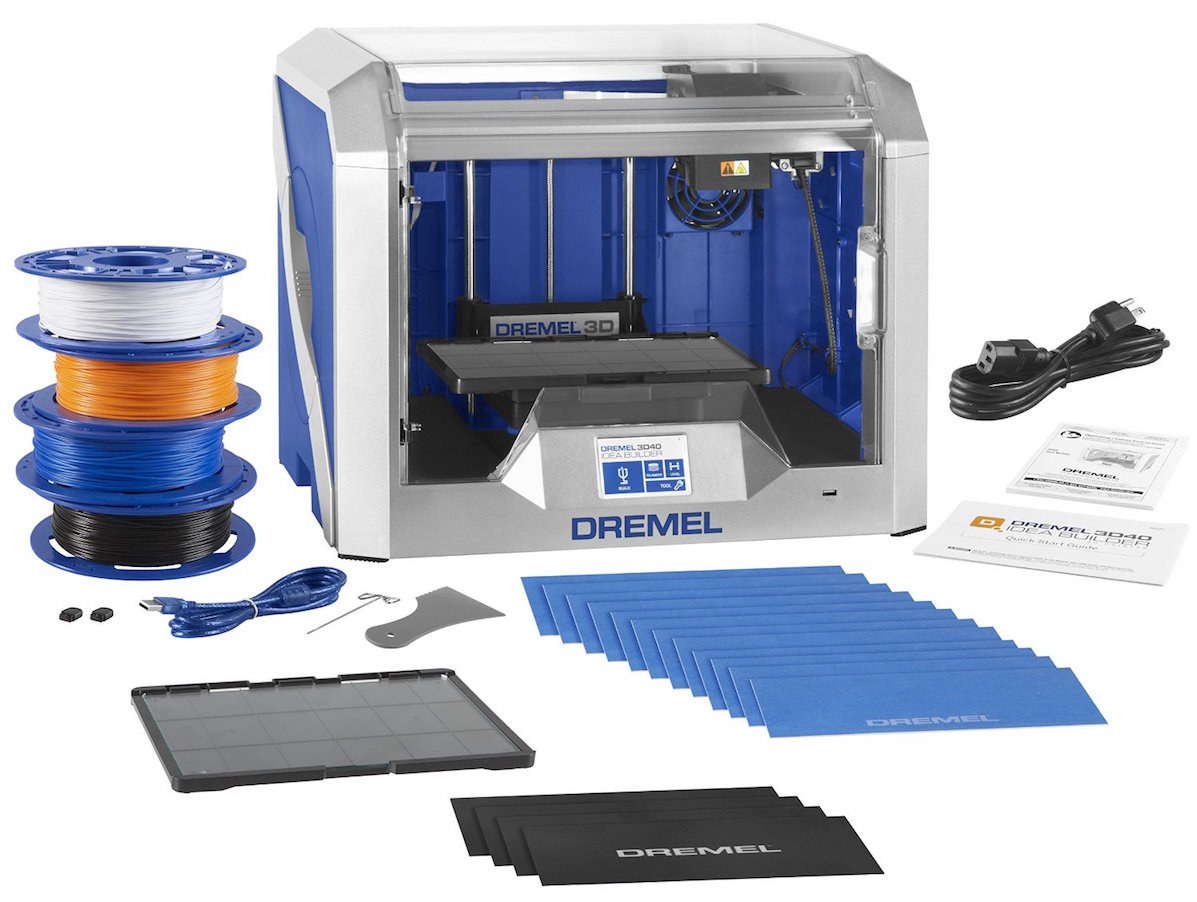
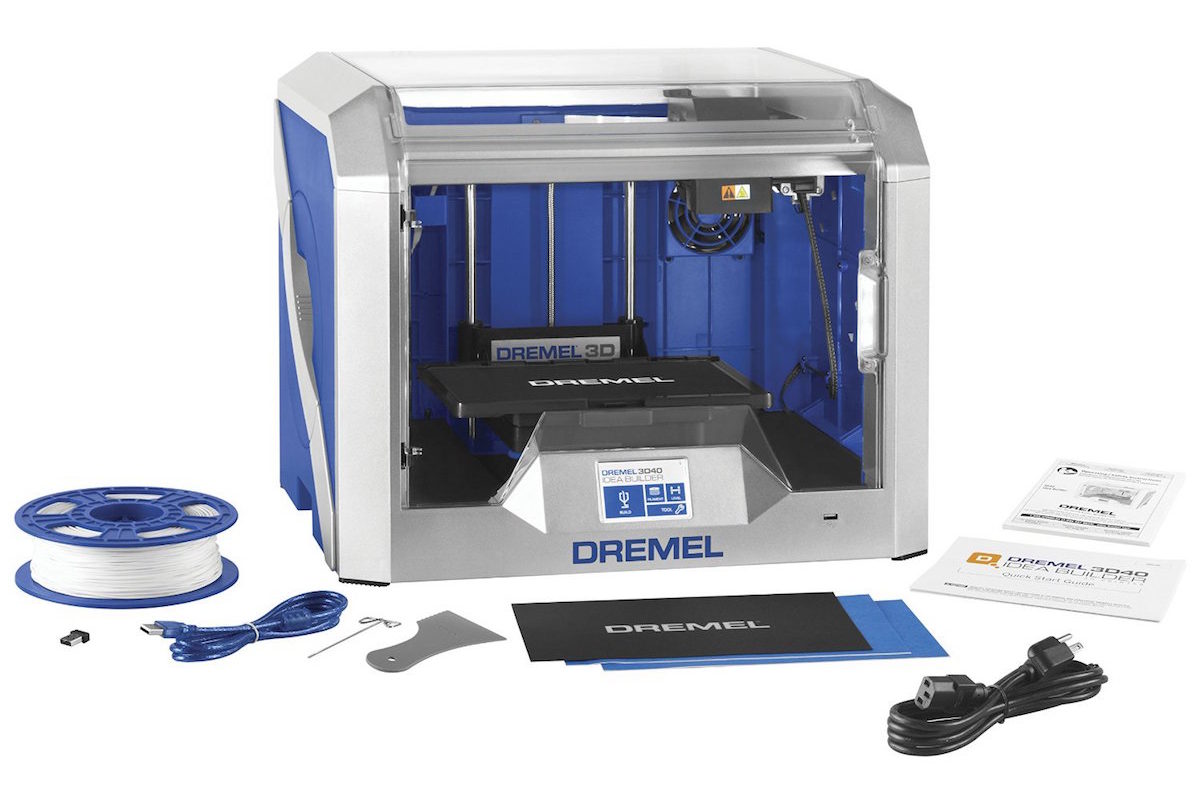
The Dremel 3D40-01 Idea Builder 2.0 3D printer is a welcome upgrade from the 1.0. The 2.0 model continues Dremel’s reputation for creating a device that is easy to use while being reliable. Ethernet and Wi-Fi connectivity makes printing that much more convenient. There is no need to rely on a computer. The unit is ready to use immediately after unpacking as the 2.0 contains printable files that enable you to test the unit by getting started on an initial project. Upon opening the box, you will find the:
• Dremel 3D40 Idea Builder
• Instruction manual
• Quick start guide
• USB flash drive
• Spool of filament
• Power cable
• USB cable
• Build sheet
• Build tape
• Object removal tool
• Unclog tool
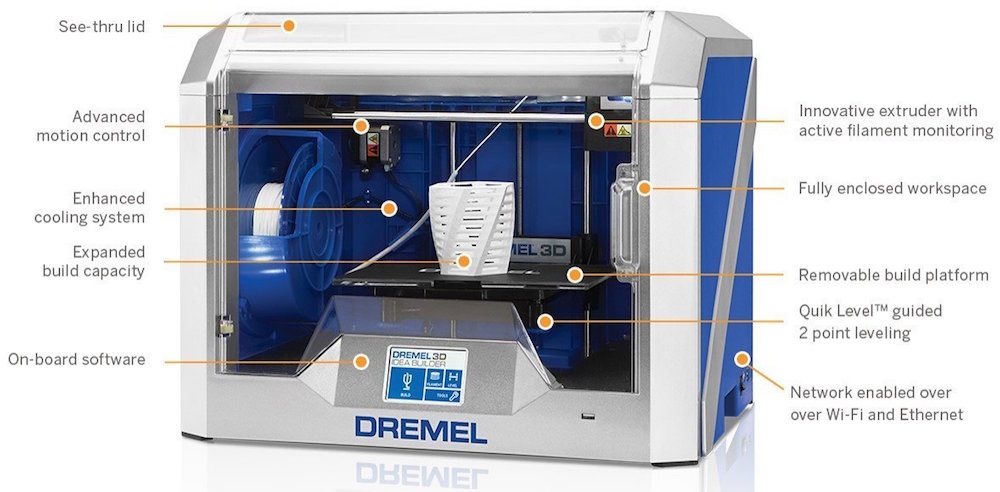
The Dremel 3D40 also has a larger building platform for creating projects measuring up to 10 inches x 6 inches x 6.7 inches. Although Dremel printers do not feature heated platforms, users have not expressed concerns. The building area remains enclosed, illuminated and cooled to prevent warping.
Lid Upgrade
While the lid on the 1.0 was blue and removable, the 2.0 features a sturdy, clear acrylic, hinged lid that provides a better view of the printing process. The larger door also stays open when needed. A magnetic closure found on the right side of the unit features a sensor that alerts the printer when the door is open or closed. The Dremel continues printing with the door open. However, a warning message comes across the control panel.
Filament Spool Changes
On the 1.0 model, users complained of the screw loosening, which caused problems with the filament channel and subsequent filament jamming or breakage. The 2.0 comes equipped with a clear sleeve on the left side of the printer. Simply feet the filament through the sleeve into the print head. The previous Dremel printer required putting the spool on the plastic adapter inside the machine. The 3D40 now loads the spool through a rounded cover on the left side of the printer. The cover turns counter-clockwise to unlock and remove. While the device may not take third party spools, there are files available to create exterior spool holders.
Auto Calibration
The 2-point platform leveling mechanism is also an upgrade. On the 1.0, users had to move the print head, and use a piece of paper to check the distance between the head and the platform. Now, the 3D40 automatically moves the print head to various positions and uses sensors to monitor and correct the distance. The on screen guide walks users through the necessary steps. Calibration basically involves turning the levelers to the position indicated on the screen until the unit beeps and a green check mark appears. Press confirm and start printing.
Printing
The Dremel 3D40 comes equipped with Autodesk’s Print Studio software. Design and edit your projects from the full-color touch screen. While the printer comes standard with basic files, more are available through the Dremel website. After completing the country of origin, preferred language and EULA settings, the printer automatically searches for an Ethernet or Wi-Fi connection. Enter a password, register the printer and get the Dremel app. After establishing your account, start printing using a smartphone, tablet or PC if using Wi-Fi. Dremel also comes equipped with advanced motion control, which minimizes the noise while a print is in progress. Once your project is completed, merely retrieve your print by removing the platform.
Whether a novice or an experienced 3D printer, the Dremel 3D40-01 is worth the investment. The upgraded version offers speed, reliability and efficiency. The company’s customer service is also outstanding. Technicians are readily available to answer questions, walk users through solutions to problems or offer helpful advice.
This Dremel Digiab 3D40 3D printer review relies heavily on specs and data from dozens of purchasers or reviewers on Amazon. The list price is $1,299 for the Dremel 3D40 but is frequently hundreds of dollars cheaper on Amazon. Be sure to check the latest reviews and current Dremel 3D printer price on Amazon for the latest information to determine if this is the right 3d printer for your needs.

Dremel Idea Builder 1.0 Review

This portion of the article is reviewing the previous model of the Dremel Idea Builder.
Until recently, the name Dremel has only been affiliated with a selection of elite hand-held power tools. However, recently the company introduced a 3D printer that they call the Dremel 3D Idea Builder. Retailing for less than $1,000, the device is available at many of the mass-merchandising locations that sell the company’s line of popular tools. The number of features, smart design and user-friendly format will undoubtedly appeal to a vast number of consumers.
Overall Design
The Idea Builder printer is a single-extruder device contained within an enclosed cabinet that measures 15.7 x 19.1 x 13.2 inches (400 x 485 x 335 millimeters). The overall construction also greatly reduces noise levels compared to competitor models. At just over 19 pounds, the unit is lightweight and portable. The cabinet features a durable polymer exterior, a removable lid and two side panels that also easily detach. On the inside, the build platform measures 9 x 5.9 x 5.5 inches (230 x 150 x 140 millimeters). The non-heated platform or bed also quickly detaches. This feature enables a user to more easily access and remove their creations. As the platform is not heat dependent, the device uses 1.75 millimeter PLA filament only.
Also on the interior is the recessed filament spool holder. In this way, the internal space seems less crowded and provides the overall illusion of fewer moving mechanical parts. The top lid allows for quick filament loading and maintenance while preventing contamination from hair, particles or other environmental debris. A plexiglass door on the front of the machine is held in place with the help of two small magnets.
Unpacking the Dremel Idea Builder
Inside the package, new 3D printer owners find a full-color, easy-to-comprehend quick start guide. There is also a printed instruction manual and two sheets of Dremel brand BuildTak. The instruction manual provides a comprehensive overview of the machine and is expertly organized. A handy glossary of terms provides 3D printing newcomers with explanations of common phrases and terms. The pre-installed extruder enables right out-of-the-box functionality. The unit also comes with:
• One spool of PLA filament
• One SD card
• A power cable
• A USB cable
• A spool lock
• A project removal tool
• A cleaning tool
• A leveling sheet
Technology
The Dremel Idea Builder printer was created in partnership with the Flashforge corporation from China. Dremel’s printer was created using the basic design of the Flashforge Dreamer. The technology includes an ARM Contex-M4 CPU with 4 GB of storage. Dremel is also coordinated efforts with Autodesk to create software options. The current software found in the Idea Builder is similar to Cura or Makerware and is compatible with both Mac and Windows devices.
The display aptly illustrates the building area in a three-dimensional image that enables users to move, rotate and scale areas. The software also highlights specific regions requiring some type of support during the printing process. However, the software does not allow for altering print temperatures, adding rafts, adjusting percentages or using customized g-code files. But, this simplifies the process for newbies. Nevertheless, the company may add these features in future software upgrades.
The engine technology is fast and features low, medium and high resolution settings, which allows for 0.3, 0.2 and 0.1 millimeter layer heights along with pre-designated infill levels. Though the device lacks advanced settings, the Idea Builder successfully presents a consumer ready device.
Additional Features
• A full-color touchscreen to venture from files to building
• A cooling fan that prevents project warping and printer over-heating
• User-friendly software
• Stand-alone operation or connectivity via SD card, USB devices or PCs using Linux, Mac, OS or Windows
• Hundreds of downloadable printing files on the Dremel website
• One-year warranty for private use
• 60-day warranty for commercial use
Reasons to buy the Dremel 3D printer:
- At just under $1,000, the price is exceedingly affordable in comparison to many other printers on the market. While this would typically mean that the printer would simply come with less features, the Idea Builder comes packed to the brim with all of the latest 3D printer features
- Dremels customer support is largely fantastic and will typically resolve users issues immediately
- Getting the 3D printer to work and loading the filament is extremely easy to do and doesn’t require much instructions to accomplish
- The Dremel website includes hundreds upon hundreds of different files to download in order to use as the subject for 3D printing, which can be rather useful
- The machine itself is well built, durable and isn’t prone to over-heating
- The noise levels when the machine is on are rather low, particularly in comparison to many other 3D printers
- The touchscreen is clear and easy to use, which aids greatly in setting up each print
Final Verdict
The growing popularity of 3D printing was no doubt the driving force behind Dremel making the decision to enter the market. Despite the fact that the Idea Builder is the first 3D printer designed by Dremel, it’s already one of the best on the market. The print quality is outstanding. The build quality of the machine, as well as the low price and fantastic customer support, make this a must buy for those interested in a 3D printer.
This Dremel 3D20 3D printer review relies heavily on specs and data from purchasers or reviewers on Amazon. The list price is $999 for the Dremel 3D20 but is frequently cheaper on Amazon. Be sure to check the latest reviews and current Dremel 3D printer price on Amazon for the latest information to determine if this is the right 3d printer for your needs.


The specs for this machine are quite impressive – large build dimensions and 100 micron resolution and it delivers when it comes to print quality. What I don’t like is that Dremel is forcing users to buy proprietary filament. You can other filament at half the price but the printer will require small modifications to be able to use it. Also, this printer doesn’t support ABS filament.
This is an excellent 3d printer especially for beginners. It doesn’t have all the bells and whistles of a Makerbot but it’s very easy to use and the print quality is very good. I also like the fact that technical support is US-based and knowledgeable.
Unlike most 3d printers in this price range this is a very mature and well built product. It’s designed with ease of use in mind. The print quality exceeded my expectations. I had bad experiences with other 3d printers I bought in the past, Dremel, however, is a keeper.
I researched quite a few reviews, and because of the overall design I bought the Dremel. I had no problems getting the device to print shortly after the unpacking. The machine soon proved to be all that I had expected. I owned two previous printers that left me with a horrendous experience. On the other hand, the Idea Builder was a welcome relief. I may have projects that occasionally do not complete perfectly. I also needed to extensively clean the nozzle once. The horizontal fan is also a design flaw. However, the part is easily replaced when it malfunctions. For the price, the machine does a fantastic job and functions as well as more expensive models.
I consider both the machine and the level of support provided by the company’s tech team to be top notch. I do not understand why the company has not made a greater effort to advertise this unit. Once word of mouth spreads concerning this gem of a printer, I’m sure the sales will increase. For all 3D printing:
1) Level the print bed before each project.
2) Perfect the Z-axis before each print. A piece of paper should easily slide under the hot end with just a touch of friction.
3) Clean the print bed with acetone before starting a project. Even a slight smudge can wreak havoc during printing.
4) Know the filament diameter and enter the measurement into the program. Otherwise all types of print errors occur.
5) Use Kapton tape followed by three coats of hairspray when working with ABS. Use blue painter’s tape for PLA.
I received my printer, opened the box and turned the machine on. While loading the filament, I noticed that the instruction screen turned off and then on again. Needless to say I ventured to the company website and got assistance within minutes. I received instructions as to how to reposition the TF card by e-mail. I was impressed with the promptness of the response by tech support. Leveling the bed and loading the filament took no time at all.
I had more problems trying to apply the print tape without bubbles. My first print was completed in the first half hour of turning on the machine. A half a day later and the printer is working like a champ. I did learn that you must clean the bed with alcohol before each build. Printing something small before attempting larger projects also sufficiently heats the bed and prevents warping. Also, trying to fill the print platform with a project leaves strings of filament laying around as the nozzle advances to different locations.
I’ve had this printer since it first became available. The Dremel is also my first 3d printer, so I cannot make any comparisons. But, the Dremel works great for me, and I have not experienced any problems. I do use other filaments, Dremel ones are extremely pricey. After emptying a few Dremel spools, I just put other filaments on the empty spools. I also discovered that printing works better if you heat the platform first. I have tried different tapes. However, I think that the plastic sheets that come with the printer provide the best results. My software seems to have a problem deciphering files that have long names. Shortening the name solves this problem easily. For the most part, my prints turn out good. Sometimes a few may need a little sanding or trimming to finish before painting.
I was new to 3D printers and did research on all the low-cost machines. I took the risk and opted for the Dremel. Thankfully there was nothing needing assembling. I had the printer up and running in less than 15 minutes. My first project was acceptable. After reading the reviews of users having problems with set-up, needing calibrations or other issues, I was happy to have escaped the difficulties.
The only problems I have experienced were related to operator error. Needless to say, tech support had my machine functional in minutes. One error involved filament loading. The other was leveling the bed properly. My only other gripe is that the Dremel software does not allow for much in the way of user control. I eventually went with Simplify 3D. I noticed that the change helped improve my builds. I am satisfied with the Dremel. I would recommend this machine for anyone wanting to get into the 3D printing field.
Pingback: 3D Home Exterior Design – Info Home Design